
Last Updated on February 13, 2024 by ankurman
Transferring a domain from GoDaddy to Hostinger involves a few steps, but it’s a relatively straightforward process. Here’s a step-by-step guide to help you through it:
1. Prepare Your Domain for Transfer:
- Log in to your GoDaddy account.
- Go to the “Domains” section and locate the domain you want to transfer.
- Ensure that your domain is eligible for transfer by meeting the following criteria:
- It’s been more than 60 days since your domain was registered or last transferred.
- It’s not within 60 days of expiration.
- The domain is unlocked.
- You’ve disabled private registration (if applicable).
- You’ve obtained an authorization code (also known as an EPP code or transfer code) from GoDaddy.
2. Unlock Your Domain:
- Under the domain settings, find the option to “Unlock” your domain. This ensures that your domain is ready to be transferred.
3. Obtain the Authorization Code:
- While in your GoDaddy account, locate the option to get the authorization code for your domain.
- Once requested, GoDaddy will provide you with the authorization code via email or within your account dashboard.
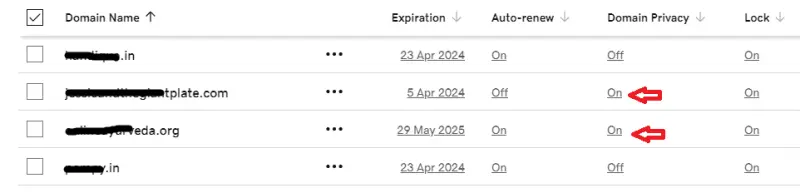
4. Disable Whois Privacy (if applicable):
- If you have Whois privacy enabled for your domain, you’ll need to disable it. This option is usually found in the domain settings.
5. Request Domain Transfer at Hostinger:
- Sign in to your Hostinger account or create one if you haven’t already.
- Navigate to the domain management section.
- Look for the option to transfer a domain.
- Enter the domain name you wish to transfer and follow the prompts to initiate the transfer process.
6. Provide Authorization Code to Hostinger:
- During the transfer process on Hostinger’s platform, you’ll be prompted to enter the authorization code you obtained from GoDaddy.
- Enter the code when prompted and continue with the transfer process.
7. Pay for Domain Transfer (if applicable):
- Depending on your hosting plan with Hostinger, there may be a fee associated with domain transfers.
- Follow the payment process to complete the transfer request.
8. Approve Transfer at GoDaddy:
- After initiating the transfer on Hostinger’s platform, you’ll receive an email from GoDaddy confirming the transfer request.
- Follow the instructions in the email to approve the transfer. This usually involves clicking on a link provided in the email.
9. Wait for Transfer Completion:
- Once the transfer request is approved by both parties, it may take several days for the transfer to be completed.
- Hostinger will notify you via email once the transfer is successful.
10. Update DNS Settings (if necessary):
- After the transfer is complete, you may need to update your domain’s DNS settings in your Hostinger account to ensure it points to the correct hosting server.
And there you have it! By following these steps, you should be able to successfully transfer your domain from GoDaddy to Hostinger. Remember to double-check all the details and follow any additional instructions provided by both GoDaddy and Hostinger throughout the process.
