

Last Updated on July 27, 2019 by ankurman
WordPress is the easiest way to create a website from scratch. Creating a website with WordPress does not require any knowledge of coding and web designing. All you need to do is drag and drop blocks.
To start with WordPress you need a web host to install WordPress. You can use the free WordPress blogging platform which not as cool as self-hosted WordPress.
A web host is a server where all the files will be stored. WordPress is a memory hogging software so it takes a lot space of the server.
For those who are planning to create a massive website with a lot of traffic should always move to cloud hosting. DigitalOcean is one such web hosting company which provides cloud hosting a very cheap price. You can start a cloud hosting account with DigitalOcean at just $5/month.
They have also plans which can host a website with millions of traffic. You can start with a $5/month plan and can upgrade when required.
One more cool thing about DigitalOcean is that now they have One Click WordPress Installation button. With this new feature, you don’t have to manually install WordPress on the Cloud server.
This tutorial was created to show how easily you can host a website on DigitalOcean.
One click WordPress installation on DigitalOcean
Step 1: Sign Up and Login to DigitalOcean account.
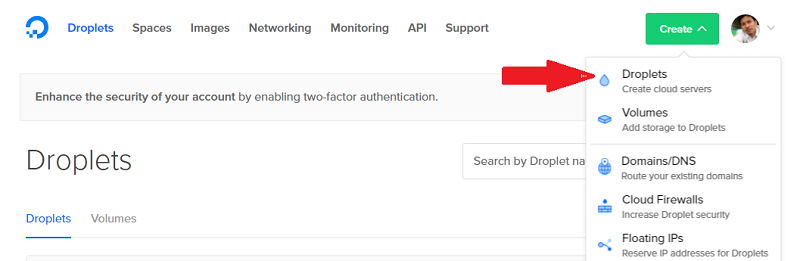
Step 2: Click on create and Choose Droplets from the dropdown menu.
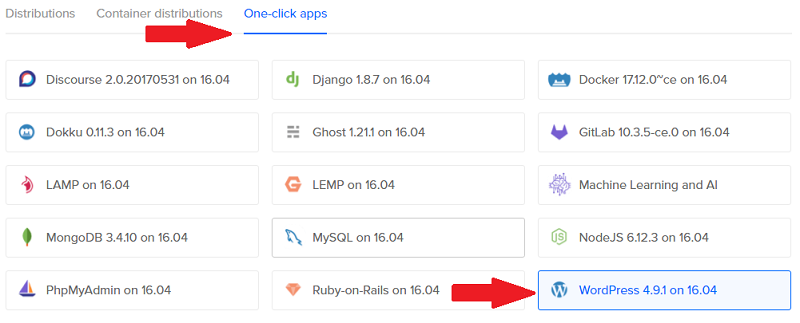
Step 3: Click on OneClick Apps and click WordPress 4.9.1(or whatever new version is running).
Step 4: Choose a Droplet size. You can start with $5/month which can run a blog with 200,000 to 300,0000 page views per month. Later on, when traffic grows you can upgrade to a higher plan.
Step 5: Leave Add Block Storage as it is.
Step 6: Choose a data center region. If you are going to target the Indian audience, choose datacentre Bangalore. Choose the datacentre near to your targeted traffic source.
Step 7: Select additional options. From these give a tick on IPv6. If you want backups of your blog, choose backups too.
Step 8: Add SSH keys. You can add SSH keys using an open source software called Putty. Download Putty using this link.
You can also skip this. If you skip this username and password will be sent to your registered email.
Why you need this SSH Key?
This SSH key will help you to connect to the DigitalOcean Server.
How to create an SSH key in the Putty Key Generator?
To create an SSH key on the Putty key Generator. Open the Putty Key generator and click create a new Key. Then save your private Key. This Key will be needing in the future to connect to the DigiatlOcran server.
Change an A file in Domain Register DNS.
Copy the IP address and create a file in domain DNS.
Create a CNAME file on DNS.
Change website/blog address from IP to a custom domain.
How to Install a free Let’s Encrypt SSL certificate on DigitalOcean?
Start your blog using the below button to get $10 free credit to your account.
